Wednesday, December 14, 2011

Finals Equal Big Post

Here's the list of what I did:
2D Introduction
2D Credits
Environment with a small wind effect (that got corrupted in transfer and couldn't be used)
Compiled the scenes into iMovie (after team members rendered them)

Here's the evidence:

Environment Render


2D Opening
Credits
Compiled scenes.

Tuesday, November 15, 2011

New Sky Dome

... seeing as it seems smarter to make my own sky scene and then make it into a sky dome, I went into Photoshop and threw together a quick sky.  It will look weird on the picture I post first, but I'll post the finished dome later; I'm about dead after working all day on animations. :D

Sunday, November 13, 2011

Playing with Color

I was just playing around with different materials in Maya on the pendant.  I didn't save this one, just wanted a picture for reference later.

Saturday, November 12, 2011

Final Model Beginnings

So, while working on the short film openings and credits, I'm also working on the model for the final project where we get to print out our models on the 3D printer in the engineering dept.  I'm going for the steampunk style since I have fallen in love with it lately.  If this turns out okay, then I may send it off to be printed in metal.  That would be really cool.

Thursday, October 27, 2011

Working on a 2D Title and Credits scene... Aaaaw Yeah!

So the title sums it up, but we are working on a short film for the next month.  I don't what kind of luck I have, but they are letting me do 2D titles and credits for our group.  SWEET! I actually really enjoy this.  I will have a screen shot up soon.

Tuesday, October 25, 2011

Sky Domes for the Group Animation

I am going to be a master at sky domes by the time this class is over.  I decided to do three different ones to start.  I am building the terra-scape in Maya.  My computer was being glitch-y over break, so these are all I have, but I can make the land really fast (I tried to make it three times or so I think, before I gave up).


Thursday, October 13, 2011

Renders for the Opera Scene

Since I didn't take "in progress" pictures there is a big jump from the blocked out scene and my final renders.  I have the project saved in stages, so I can go back and take the "in progress" pictures.
I actually enjoyed this, no matter how much I gripe about it.  I just hate the Windows (sorry Jeff :D ).


Thursday, September 22, 2011

First Screenshot for Max

... I'm actually kind of impressed.  I shouldn't be saying this, but since Principles of Animation has stolen my soul, I haven't really worked on this much.  I managed to block my scene out in about 10-20 minutes in between Principles and this class.  Go me! (although it's SUPER simple and unrefined)

Wednesday, September 21, 2011

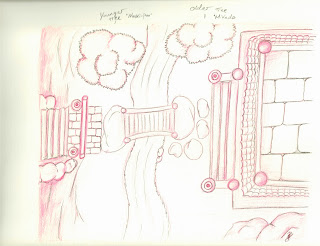
Layouts for Opera Set

Here are the three layout pics I drew up for our opera set.  I'll be adding a few more symbolic things here and there... one of my drawings has a note on it about the trees so I won't forget.  The river will be the tough part I bet.  Also, I will probably stretch it out a bit more because traditionally, Japanese temples don't have rivers around them... I think it is going to become a pond instead of a river.  That is at least a little more believable.  Then I can make fish too!


Tuesday, September 13, 2011

Research for Opera Set

Our first project is a model that could be used in an opera of our choice.  We are including multiple camera angles and textures.  I picked the opera "The Mikado," which is actually a pretty funny opera, set in Japan, though non of the words or names besides "Mikado" are even remotely Japanese.  They are basically "baby-speech" names from England.
The story in short:  The Mikado's son is traveling as a minstrel, known as Nanki-Poo when he comes to a village and falls in love with a girl, Yum-Yum, who is engaged to "the lord high executioner."  The girl's fiance, Ko-Ko, was given his job when a law is passed that "flirting" is outlawed.  Even so, he has been accused of this crime and is on death row himself.  Now, to get around his sentance that would have him kill himself, Ko-Ko tells Nanki-Poo that he can marry Yum-Yum for a month and then pretend to be executed.  Nanki-Poo agrees because he loves the girl and because a lady at his father's court, Katisha, wants to marry him (and she is well known for being absolutely terrible).  So everything is going acording to plan when suddenly the Mikado (the ruler of the land) visits, looking for his son with Katisha.  They find that he has been "executed."  Even though the Mikado accepts it, he tells Ko-Ko, Yum-Yum, and one other friend involved in the plot that they will be executed.  Ko-Ko begs Nanki-Poo to come out of hiding, but Nanki-Poo fears Katisha.  So they make a new plan to have Katisha marry Ko-Ko (which he eventually persuades her to do).  Then Nanki-Poo returns, and though Katisha is mad, the Mikado lifts the execution sentence.
.... not exactly short huh?  But it's funny.
So, here are the research pictures I have so far (THESE ARE NOT FOR SALE! THEY ARE ONLY FOR RESEARCH!!!):


3Ds Max®

I've been watching tutorials on Digital Tutors and I haven't hardly understood a word they were saying.  So, went to watch the videos included with the software and was eventually directed to the Autodesk® Youtube Learning site:
http://www.youtube.com/3dsmaxhowtos#p/c/65F8B8755BFDAA1E/2/gBROk4y0i_g

I'll post research later this week.  FOR THE RECORD: I'M A STUDENT AND ALL RESEARCH IMAGES ARE NON-PROFIT AND JUST FOR RESEARCH!!!!!

Thursday, September 1, 2011

New Semester Means New Class: Animation II

So, I must make a formal apology first: it seems that I violated a copyright rule for a couple of research images I used last semester.  I am very sorry and did not realize that they were copyrighted as such.  They were merely used for research and that I would never think of selling them or claiming them as my own.  I would love to have one of these beautiful cats (Abyssinians), and I will not use their pictures publicly until  have my own.  I will also try to remember this for future reference images, only leaving links, not images.  Again, I am very sorry.  Please forgive my breach in protocol.

Now, I am starting a new animation class and the first project is a set from a famous opera.  I have chosen The Mikado by Arthur Sullivan (music) and W.S. Gilbert (writer).  Don't know what scene I'm doing, but we'll see.

Tuesday, April 26, 2011

Batch Render

Well, here's my batch render video.  It didn't render out the fur or the grass, or the different colored background.  I have no idea why. Maybe someone can help me before class.  If not, then this is the very best I can do.

Monday, April 25, 2011

Even Though it Won't Be Complete

I wanted to post at least what I've got.  I won't have all of the animations because my rig was too messed up.  I re-rigged it four times, weighted it three times, and it still could not be fixed.  I had to settle for a stationary animation.  There are five motions, but not what was asked.  I will work all summer on trying to figure it out  (that and make a Brass Rings worthy model).
I'll post my rendered video before the final tomorrow (well, later today as it is) morning.  For now, it's just a screen capture, single frame render, and my playblast video.

(This is an actual grass texture on a plane, and viewed from my camera with lights added)


It isn't going to work

I have tried everything I can.  I have read the book, I have listened to Digital Tutors, found other online tutorials, and posted to CG Society.  I have not been able to solve the problems of my rig.  There is no way it will animate fully.  I can't fix it.
All I can say is that over the summer there won't be much else that I do besides work and learn Maya.

Sunday, April 24, 2011

Trouble with Skin Weights

I assure you that I have been working on this since I got back from church this morning.  I cannot get the skin weights on the legs and body to work completely right and since my book shows an interactive skin bind and I'm using a smooth bind (because I tried the other and this one works better) I'm kind of in the dark about what I'm doing.  I hope I have a fully weighted and animated model on Tuesday, but it is starting to look like I'm not going to make it.
I did manage to get the ears to move close to right.  You can't tell that the skin around the base isn't quite right thanks to the fur (thank the Lord for furry animals).


Saturday, April 23, 2011

RIGGING DONE (or at least as done as it's going to be)

I have done this rig FOUR times now... This is the best I can do.  I think it's safe to say that I will not go into rigging as a career...
Tomorrow (Sunday afternoon) I'll get it weighted and hopefully moving around a bit.  It won't be as awesome as I had hoped, but it should be okay.

Friday, April 22, 2011

More Fur!

Just wanted to upload a pic of my newest fur render.  I made the fur more dense and made the length of the undercoat longer.  So he looks spotty, but at least there's more fur. 


Thursday, April 21, 2011

First Furry Render!

I just finished working on the fur render.  Starting over on the rig again.  Thanks to the Creative Crash tutorial, I might understand what I'm doing.  I kind of wish I had made eyes that move... that I could make all shiny... maybe I'll work on it this summer and make a better model.

Tuesday, April 19, 2011

Problems with the front legs

Just wanted to post the images of the problems I've encountered with the front legs on my rig.  I did post the pics on CG Society forum and asked for help.  I hope that I will be able to get it all fixed.  I also played with the skin binding, and discovered that it's going to be difficult since I have so many polygons on my model.  But, it will get done.  I might live in the Mac Lab for a while, but it will be done.


Friday, April 15, 2011

Legs Rigged

I had to go back and start over with the rigging in the legs... And they still didn't turn out right.  I think the problem with the way they work now is because I don't have any pole vectors. IK blends, or set driven keys (maybe I'm totally wrong on that).  I really need some help on Tuesday.  I'll try to work on it a bit more by then, but I'm really confused about so things.

Here are the two rig pics I have:

Thursday, April 14, 2011

Explanation for lack of progress for last night and this morning

I had a bit of an emotional upheaval and a (rather foreshadowed) break up.  Well, I'm feeling a little better now, and will whole heartedly throw myself into modeling!  I should have everything rigged by Friday afternoon because I'm going to Missouri this weekend (I need to get away).

Here's a pic I haven't posted yet:

I did take out some of the joints after doing this and I have rigged the front left leg (just forgot to take a picture of it).  I'm basically completing this while following along with my book tutorial.

Saturday, April 9, 2011

Restarted the Rigging

I restarted my rigging.  I'm to the point of organizing my Outliner, and then mirroring the joints when I finish that.  I should have all of that done by Monday so I can work on animating or adding fur when we are in class Tuesday.


Friday, April 8, 2011

Maya and Fur

I finally got the colored version into Maya.  Now I can start rigging while I'm figuring out how to precisely use the fur function.  Although, I have found the right combination for the fur.


Thursday, April 7, 2011

COLOR

So, I realized I would have to do any poly-painting before I got serious with Maya.  I went back to Mudbox and did some painting.  I'll put it back into Maya next and add the bones again, and then I'll add the fur render.